
Assembling a single-size wooden bed frame is a highly manageable DIY project that can instantly elevate your bedroom’s comfort and style. To successfully build a bed frame wood assemble single size setup, you must follow a logical sequence from the outer perimeter to the inner support structure. Taking your time ensures the joints remain stable, the frame sits square, and the structural integrity is maintained for years. By organizing your workspace, understanding your specific frame’s hardware, and systematically securing each component, you can avoid common pitfalls like squeaky slats, misaligned rails, or stripped wood.
Pre-Assembly Preparation for Small Bedrooms
Before unboxing your new furniture, you must prepare both your tools and your physical space. This is especially critical in compact living environments, such as high-rise condominiums in Metro Manila, where tight hallways, narrow doorways, and limited elevator dimensions can make maneuvering fully assembled furniture exceptionally difficult. First, measure your available floor space and compare it to the finished outer dimensions of the bed frame listed in your manual. Ensure you have cleared a working area that is at least twice the size of the bed itself. This gives you ample room to lay out parts without scratching the wood or your floors.
Next, gather your tools. While most flat-pack furniture includes basic tools, having high-quality hand tools ready will make the process much smoother. You will typically need:
Products mentioned in this guide






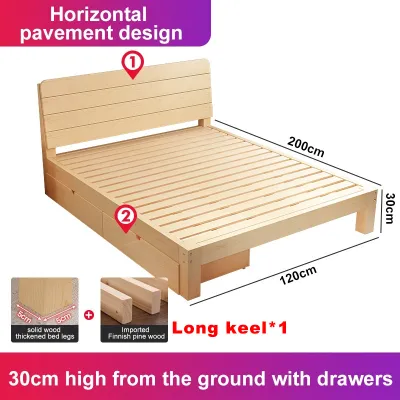
Prices are valid at publication and may change. Please refer to the product page for the latest price.
- An Allen wrench (often provided, but a T-handle version offers better leverage)
- A Phillips screwdriver (with a comfortable grip to prevent slipping)
- A rubber mallet (essential for gently tapping wooden dowels or tight joints into place without denting the finish)
Unbox all components carefully and group them by type. Lay the headboard, footboard, side rails, and slats flat on a clean, soft surface, such as a large cardboard box or a blanket, to protect the protective finish from scratches. Count every bolt, washer, nut, and wooden dowel, comparing them directly to the parts checklist in the manufacturer’s manual. If any hardware is missing or if you notice visible cracks in the structural joints of the wooden pieces, stop immediately and contact the manufacturer or retailer for replacement parts before proceeding.
Finally, plan to assemble the frame as close to its final resting position as possible. Once a solid wood frame is fully constructed, its weight and rigid shape make it highly challenging to rotate or carry around tight corners, wardrobes, or vanity mirrors in a small bedroom.
Step-by-Step Bed Frame Wood Assemble Single Size Guide
To ensure a squeak-free and long-lasting build, you must approach the physical assembly with a systematic, step-by-step strategy. Building a bed frame always progresses from the outer structural shell inward to the internal support network. Before you begin, always check your specific product’s label and the manufacturer’s assembly instructions. If our general steps conflict with your product’s manual, stop and consult the manufacturer or a qualified professional. Keep the manufacturer’s instruction manual open and visible throughout the process. Joint mechanisms vary significantly across different brands and models; some designs utilize traditional mortise-and-tenon joints, while others rely on heavy-duty steel corner brackets, cam locks, or direct bolt-through systems. Understanding how your specific model connects is key to preventing damage to the wood during assembly.

Step 1: Connect the Headboard, Footboard, and Side Rails
The first major objective is to establish the outer rectangular frame by connecting the side rails to the headboard and the footboard. Start by positioning the headboard upright against a wall for support, or have a helper hold it steady. Align the mounting brackets or pre-drilled holes on the first side rail with the corresponding connection points on the headboard. If your frame uses wooden dowels for alignment, gently tap them into place using a rubber mallet before bringing the wooden pieces together.
Once aligned, insert the specified bolts along with their flat washers and spring washers. The washers are critical because they distribute the pressure of the bolt head and prevent it from sinking too deeply into the soft wood fibers. A vital rule of thumb during this initial phase is to tighten all bolts only to about 80% capacity. Leaving the hardware slightly loose allows the frame to flex and shift slightly, which is incredibly helpful when you attempt to align the opposite side rail and the footboard.
Repeat the connection process for the second side rail, and then attach both rails to the footboard to complete the rectangle. Before you tighten anything further, check that all wooden joints are flush, meaning the surfaces meet evenly without gaps. Use a tape measure or a simple visual check to ensure the frame is perfectly square; you can verify this by measuring diagonally from opposite corners. If the two diagonal measurements are equal, your frame is square, and you can proceed to the next step.
Step 2: Install the Center Support Beam and Slats
With the outer frame securely aligned, you can now focus on the internal support system, which bears the weight of the mattress and the sleeper. While some single-size wooden bed frames rely solely on thick side rails, many modern designs include a center support beam to prevent sagging and extend the lifespan of your mattress. If your single bed frame includes a center support beam, align it with the metal brackets located on the interior of the headboard and footboard. Secure it using the provided short bolts, ensuring it sits level with the side rails.
Next, prepare to install the wooden slats. Slats typically come in one of two styles: a connected roll linked by fabric straps, or individual rigid wooden boards. Unroll or lay out the slats evenly across the inner ledges of the side rails. The fabric straps on roll-out slats should face upward or downward according to the manufacturer’s specifications; usually, they face down to keep the wood from directly rubbing against the mattress.
To prevent the slats from shifting—which is the primary cause of annoying squeaks and structural instability—you must anchor them. Most manufacturers provide pre-drilled holes at the ends of the slats that align with the side rails. Secure these points using wood screws. If your frame uses plastic holders or pegs to lock the slats into place, press them firmly into the designated slots until they click. Ensure the spacing between each slat is uniform to guarantee consistent weight distribution and prevent the mattress from pocketing or sagging over time.
Step 3: Final Tightening and Hardware Check
Now that the entire bed frame is fully assembled and square, it is time to perform the final structural lock. Go around the entire perimeter of the frame with your tools, systematically tightening every bolt, nut, and screw that you previously left at 80% tightness. Work in a diagonal pattern—tightening one corner, then moving to the opposite diagonal corner—to ensure the tension is distributed evenly across the frame.
During this step, you must exercise caution to avoid over-tightening. Wooden bed frames are susceptible to damage if excessive force is applied. Over-tightening can strip the pre-drilled wood threads, split the solid wood grain around the joint, or warp the metal brackets. Tighten each bolt until it is snug and you feel firm resistance, then stop.
Once all connections are secure, conduct a thorough inventory of your workspace. If you find any leftover washers, bolts, or brackets that were not explicitly labeled as “spare parts” in your manual, stop and re-examine your steps. Every piece of hardware serves a structural purpose, and omitting a single washer can lead to joint wear, squeaking, or premature failure of the frame under load.
Testing Stability and Safety
Before placing your mattress on the newly assembled frame, you must verify that the structure is completely stable and safe for daily use. Begin by applying physical pressure to different areas of the frame. Stand next to the bed and firmly push down on all four corners, then apply pressure to the center support beam and the slats. Shake the frame gently from side to side and from head to foot. It should feel rigid, solid, and free of any noticeable flexing or wobbling.
As you perform this physical test, listen carefully for any squeaks, creaks, or clicking noises. If you hear any sound, it indicates that two components are rubbing together under tension. Most often, this is caused by a slightly loose bolt on a corner bracket or a slat that is not fully secured to the side rail. Pinpoint the source of the noise, loosen the affected area slightly, realign the pieces, and retighten the hardware securely.
Finally, check how the bed frame sits on your bedroom floor. In many Philippine homes and condominiums, tiled or concrete floors may have slight leveling imperfections. If one of the bed legs does not make firm, flat contact with the floor, the frame will wobble, putting uneven stress on the joints. To resolve this, stick heavy-duty felt pads under the legs. Not only do felt pads compensate for minor floor unevenness, but they also protect your flooring from scratches and significantly reduce noise transfer to the unit below—a crucial consideration for peaceful condo living.
Maintenance Tips for Wooden Bed Frames
A wooden bed frame is a natural, dynamic piece of furniture that requires minimal but regular maintenance to preserve its beauty and structural integrity. Wood is a hygroscopic material, meaning it naturally absorbs and releases moisture from the surrounding air. In the tropical, high-humidity climate of the Philippines, seasonal shifts in humidity can cause the wood to expand and contract slightly. Over time, this natural movement can cause bolts and screws to gradually work themselves loose. To prevent this, make it a habit to inspect and gently retighten all hardware every 6 to 12 months.
In addition to structural checks, proper cleaning is essential to protect the wood’s protective finish. Wipe the frame regularly with a soft, dry microfiber cloth to remove dust. If a deeper clean is necessary, use a slightly damp cloth with a mild, pH-neutral soap, and dry the surface immediately with a clean towel. Avoid harsh chemical cleaners, bleach, or abrasive scrubs, as these can strip away the protective varnish or wax, leaving the raw wood vulnerable to moisture damage, warping, or discoloration. Always refer to the manufacturer’s care instructions for your specific wood finish to ensure long-term durability.
Frequently Asked Questions (FAQ)
Do I need a center support beam for a single wooden bed frame?
While many larger bed frames (such as queen or king sizes) absolutely require a center support beam to handle the span, single-size frames do not always need one. If your single frame is built with thick, robust side rails and closely spaced, heavy-duty wooden slats, it can easily support a standard mattress without a center beam. However, adding a center support beam provides extra insurance against sagging and extends the overall lifespan of both the frame and the mattress. Always defer to the manufacturer’s structural design; if a center beam is included in your box, it must be installed to maintain the frame’s safety rating and warranty.
Why is my newly assembled wooden bed squeaking?
Squeaking in a newly built wooden bed is almost always caused by friction, either from loose hardware, wood rubbing directly against wood, or uneven contact with the floor. To eliminate the noise, start by double-checking all corner bolts and slat screws to ensure they are fully snug. If the squeak persists, check if the wooden slats are rubbing against the side rails; applying a thin layer of felt tape or paraffin wax along the contact ledges can act as a silent barrier. Lastly, ensure all legs rest evenly on the floor, using felt pads to correct any minor wobbles.
Community discussion
Share your experience or ask a question. Comments are reviewed before publication.