
Installing a metal wall-mounted umbrella and key organizer is an excellent way to reclaim entryway floor space and keep your daily essentials organized. This dual-purpose storage solution keeps wet umbrellas contained while keeping your keys, lanyards, and small accessories easily accessible right by the door. In tropical regions like the Philippines, where sudden downpours and high humidity are part of daily life, a secure and stable installation is essential to handle the weight of damp, heavy umbrellas without damaging your walls.
To ensure your rack stays firmly anchored, you must follow a methodical installation process that matches your specific wall type. Whether you are dealing with solid concrete, hollow blocks, or drywall, taking the time to prepare your tools, assess your wall, and mount the hardware correctly will prevent the rack from sagging or pulling loose over time. This step-by-step guide walks you through the entire process, from selecting the right drill bits to verifying the final weight capacity.
Preparation: Tools Required and Wall Assessment
Before making any marks on your wall, gathering the correct tools and understanding the wall’s composition will save you time and prevent unnecessary damage to your home. Using the wrong drill bit or anchor is the most common cause of failed wall installations, so a quick assessment beforehand is critical.
Products mentioned in this guide
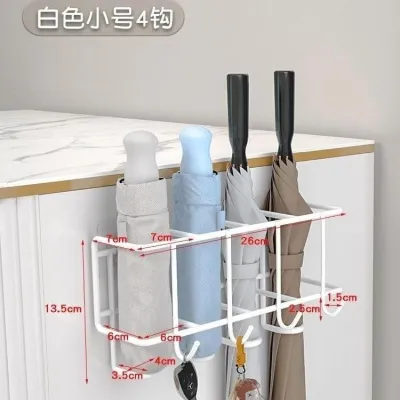
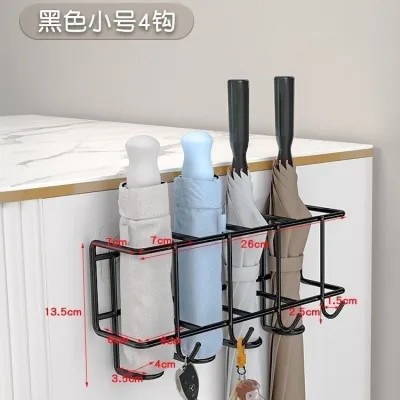
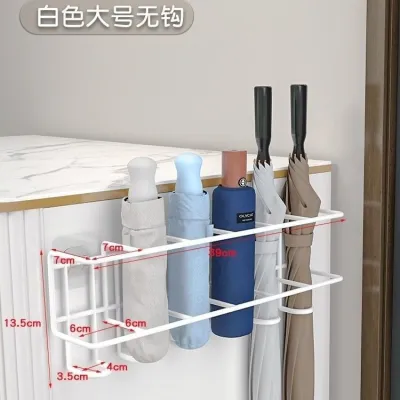
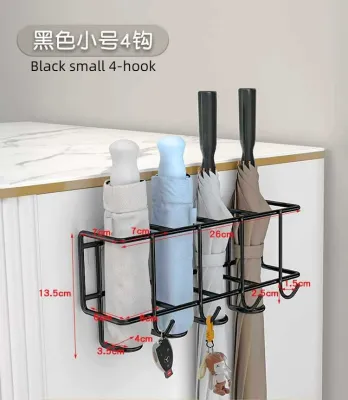
![[🇵🇭 Stock&COD] Umbrella Rack Wall-mounted Umbrella Storage Rack Holder Wall Umbrella Organizer](https://img.lazcdn.com/g/p/eec8cec17f2abae5f751439a355f2725.jpg_400x400q80.jpg_.webp)
Prices are valid at publication and may change. Please refer to the product page for the latest price.
To complete this installation, you will need the following essential tools:
- Power drill: A standard rotary drill works well for drywall and wood, while a hammer drill is highly recommended for concrete or brick walls.
- Drill bits: You must match the drill bit to your wall material. Use a masonry bit for concrete or brick, and a standard wood or twist bit for drywall and wooden studs.
- Screwdriver: A manual screwdriver or a drill with a screwdriver bit to secure the mounting screws.
- Spirit level: Essential to ensure your rack is perfectly straight and level.
- Measuring tape and pencil: For marking precise distances and drilling locations.
- Wall anchors and screws: While most racks come with a basic hardware pack, you must verify if the included anchors are suitable for your specific wall type.
Assessing your wall type is the most critical step of preparation. In many Filipino homes, interior and exterior walls are constructed from concrete hollow blocks (CHB) or solid poured concrete covered with plaster. If you tap the wall and it sounds solid and dense, you are dealing with concrete or brick, which requires heavy-duty plastic wall plugs (expansion anchors) and a masonry drill bit. If the wall sounds hollow when tapped, it is likely drywall or fiber cement board mounted on metal or wood studs. Drywall requires specialized self-drilling anchors or toggle bolts if you cannot align the rack with a wall stud.
Finally, conduct a space and clearance check. Measure the physical dimensions of your umbrella rack—whether it is a compact 4-grid model or a larger 6-grid variant—and compare them against your chosen wall space. Ensure there is enough vertical clearance below the rack so that long, full-sized stick umbrellas can hang freely without touching the floor, hitting your baseboards, or blocking the sweep of nearby doors.
Step-by-Step Installation Process
Once you have verified your wall type and gathered your tools, you can proceed to the physical installation. Taking your time during these steps ensures a clean, professional finish that will last for years.

Marking the Drill Holes
The first physical step is determining the ideal mounting height and marking your drilling points. Because this organizer holds both long umbrellas and keys, finding a height that accommodates both functions is key. The upper key hooks should sit at a comfortable, reachable level for everyone in the household—typically between 120 to 150 centimeters from the floor—while still leaving enough space below for long umbrellas to hang without dragging on the ground.
To mark the holes accurately, follow this procedure:
- Position the rack: Hold the metal rack against the wall at your desired height.
- Level the frame: Place your spirit level on top of the rack's flat frame. Adjust the angle of the rack until the bubble in the level is perfectly centered between the two indicator lines.
- Mark the holes: While holding the rack firmly in place with one hand, use a sharp pencil to mark the exact center of each pre-drilled mounting hole onto the wall.
- Verify the marks: Set the rack down and use your measuring tape to check that the marked points are equidistant from adjacent walls or door frames, ensuring the placement looks balanced.
Drilling and Securing the Rack
With your markings clearly visible, you are ready to drill. This stage requires precision and the correct technique based on your wall assessment.
If you are drilling into a concrete or brick wall, set your hammer drill to the hammer setting. Hold the drill perfectly perpendicular to the wall to prevent the hole from widening or angling downward. Apply steady, firm pressure and drill to a depth slightly deeper than the length of your wall anchor. To gauge this easily, wrap a small piece of painter’s tape around your drill bit at the desired depth as a visual guide. For drywall or wood, use a standard drill setting without the hammer action to avoid tearing the wall material.
Once the holes are drilled, clear out any dust or debris from inside the holes using a vacuum or a hand blower. Insert your wall anchors into the holes. They should fit snugly; if they are slightly tight, gently tap them with a mallet or the handle of your screwdriver until they are completely flush with the surface of the wall. If an anchor bends or refuses to go in, do not force it—remove it, clear the hole of any remaining dust, and ensure the hole is deep enough.
Next, align the mounting holes of the metal rack with the installed wall anchors. Insert the screws through the rack’s mounting holes and into the anchors. Tighten the screws using a manual screwdriver to maintain maximum control. Avoid using a high-torque power drill to tighten the screws completely, as over-tightening can easily strip the plastic anchor inside the wall, crack your drywall, or scratch the protective paint finish of your metal frame. Tighten until the screw head is firm against the rack and the frame does not wobble.
If at any point during this process the wall material crumbles excessively, the anchor spins freely inside the hole, or the rack feels loose after tightening, stop immediately. This indicates that the wall material is too weak for the chosen anchor. You will need to reassess the wall and upgrade to a heavier-duty anchor, such as a toggle bolt or a metal expansion sleeve, to ensure a safe hold.
Weight Capacity and Safety Verification
A wall-mounted umbrella rack must support more weight than a standard key holder. Wet umbrellas absorb a surprising amount of water, which significantly increases their weight, placing extra stress on your wall anchors and the rack’s welded joints.
Before placing any items on your newly installed rack, perform a manual load test. Gently apply gradual, downward pressure on the metal frame with your hands. Watch the mounting points closely for any signs of movement, sagging, or pulling away from the wall. If the rack flexes slightly but the anchors remain perfectly still and flush against the wall, your installation is secure.
To maintain long-term stability, practice proper weight distribution. If you have a 4-grid or 6-grid metal organizer, avoid crowding all your heavy stick umbrellas onto one side. Distribute them evenly across the grid slots to balance the downward force on the mounting screws. This prevents uneven stress, which can cause one side of the rack to gradually tilt or pull the anchor out of the wall over time.
Always refer to the manufacturer’s documentation for the specific maximum weight limit of your organizer. Metal thickness, welding quality, and frame designs vary widely between brands. A typical light-duty metal organizer might support up to 5 to 10 kilograms when properly anchored, but you should never exceed this limit. Do not use the umbrella grids to hang heavy school bags, wet coats, or grocery bags unless the manufacturer explicitly states that the frame and hooks are rated for such heavy loads.
Daily Use and Maintenance Tips
Maintaining your metal organizer properly will extend its lifespan and protect your home’s interior, especially during the humid rainy season. Because wall-mounted umbrella racks are designed to save space, many models do not feature large, built-in drip trays to catch water.
To protect your flooring from water damage, implement a simple drip management strategy. If your rack is mounted over sensitive flooring like wood laminate, parquet, or polished concrete, place a small waterproof drip tray, a silicone mat, or an absorbent entryway towel directly beneath the hanging umbrellas. This catches falling water droplets and prevents pooling, which can warp wood or create slipping hazards.
Metal care is also vital in humid environments. Even if your rack features a powder-coated or painted finish, prolonged exposure to moisture can lead to rust if the surface is scratched or chipped. Periodically wipe down the metal frame with a soft, dry microfiber cloth to remove water spots, dust, and salt residue. Avoid using harsh chemical cleaners or abrasive scrubbing pads, which can strip away the protective coating. Always refer to the manufacturer’s care instructions for specific cleaning recommendations.
Finally, keep your key hooks organized. While it is tempting to hang heavy key rings, pocket knives, or decorative lanyards on the hooks, overloading them can bend or snap the smaller metal hooks over time. Reserve the upper hooks for daily-use keys and lightweight items, ensuring your entryway organizer remains both functional and visually appealing.
Frequently Asked Questions (FAQ)
Can I install this umbrella rack on a tiled wall?
Yes, but drilling into tiles carries a high risk of cracking or shattering the ceramic or porcelain surface. To do this safely, you must use a specialized diamond or carbide-tipped tile drill bit and drill at a slow speed without using the hammer function. Once you penetrate the tile, you must switch to a masonry bit to drill into the concrete or brick wall behind it. Ensure your wall anchors are long enough to pass completely through the tile and adhesive layer into the solid wall behind. If you are working with expensive tiles or are unsure of the wall material behind them, it is highly recommended to consult a professional handyman.
What should I do if the provided screws do not fit my wall anchors?
Never attempt to force mismatched screws into wall anchors, as this compromises the structural integrity of the mount. If the screws are too loose, the rack will wobble and eventually fall; if they are too tight, they can split the anchor inside the wall. If you find that the provided hardware does not fit properly or is of poor quality, take one of your wall anchors to a local hardware store. Purchase high-quality, corrosion-resistant steel screws that match both the diameter and length of your anchors, ensuring they also fit cleanly through the pre-drilled mounting holes of your metal rack.
Community discussion
Share your experience or ask a question. Comments are reviewed before publication.